
The Complete Guide to Preserving Fresh Herbs: Drying, Freezing, and Infusing
There is a particular kind of guilt that comes with a fridge drawer full of wilting coriander, or a basil plant that has bolted the week you were away. Herbs grow fast, and they do not wait patiently for you to catch up with them.
The good news is that turning a glut, a bolt, or an end-of-season clear-out into something you will actually use again takes no special equipment. Drying, freezing, and infusing are three simple, home-grown ways to stretch a harvest across the whole year, and this guide walks through all three, step by step.
As an Amazon Associate I earn from qualifying purchases and sometimes recommend products from other sellers at no extra cost to you. For more details see my disclosure policy and privacy policy.
When and How to Harvest Herbs for Best Flavour
Timing matters more than most people expect. Herbs are at their most flavourful in the late morning, once the dew has dried off but before the midday sun draws out too much moisture and softens the essential oils.
Forged & Grown — The Shop
Handpicked products chosen to fit the way we cook, grow, and create. Nothing generic — every item earns its place.
Visit the Shop


Harvest herbs just before they flower rather than after, since energy that goes into blooms is energy that leaves the leaves, and post-flower foliage tends to taste thinner and slightly bitter. Take no more than a third of any one plant at a time so it can keep growing.
Once picked, give herbs a gentle shake to knock off any insects, then a light rinse in cool water if they look dusty or splashed with soil. Pat them dry thoroughly with a tea towel or salad spinner before doing anything else, since damp leaves are the single biggest cause of mould in dried herbs and the biggest risk factor in almost every preservation method that follows.
Which Preservation Method Suits Your Herb?
Answer 4 quick questions and we’ll tell you whether to dry it, freeze it, or infuse it.
What kind of herb are you working with?
Method 1: Drying Herbs
Drying is the simplest, most shelf-stable way to preserve herbs, and it needs nothing more specialist than air, jars, and a bit of patience. It concentrates flavour into a smaller volume, which is why a teaspoon of dried oregano can do the work of a tablespoon of fresh. The trade-off is a slightly flatter, less bright flavour than fresh or frozen herbs, so it suits pantry staples more than delicate garnishes.
Air-Drying: Hanging Bundles
This is the easiest method and needs no equipment at all. Gather small bundles of herbs, no thicker than your finger and thumb can comfortably circle, and tie the stems with string or a rubber band.
Hang the bundles upside down somewhere warm, dry, and out of direct sunlight, ideally with some airflow. A kitchen away from the steam of the hob, an airing cupboard with the door slightly ajar, or a spare room all work well. Most sturdy herbs will be fully dry within one to two weeks.
Dehydrator Drying
A food dehydrator gives the most consistent results because you can control both temperature and airflow. Spread herb leaves in a single layer on the trays and set the thermostat to around 35-46°C (95-115°F), pushing towards the higher end in a humid kitchen.
Drying times vary by herb and leaf thickness, but most soft-leaved herbs are ready within one to four hours. Check every hour or so once you are within the expected window, since over-drying dulls both colour and flavour.
Low Oven Drying
An oven works in a pinch, though it is the least gentle of the three methods and can strip some flavour and colour compared with air-drying or a dehydrator. Set the oven to its lowest possible setting, ideally no higher than 80°C (175°F), and prop the door open a crack with a wooden spoon to let moisture escape.
Spread herbs on a baking tray lined with baking paper and check every 30 minutes. Most herbs will be dry within two to four hours, and pulling them slightly early rather than late protects more of the flavour.
Which Herbs Dry Well, and Which Don’t
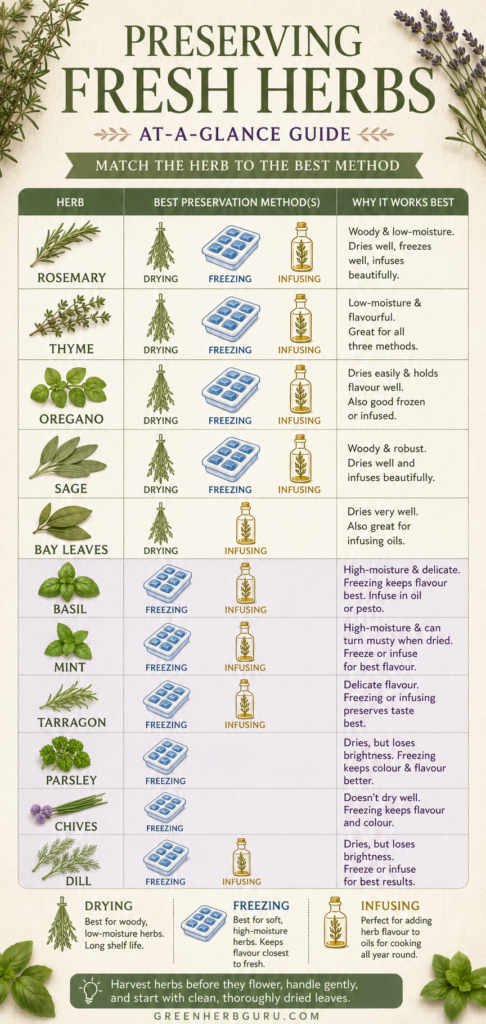
Woody, low-moisture herbs are the easiest to dry successfully and hold their flavour well afterwards. Rosemary, thyme, oregano, sage, and bay all dry beautifully using any of the three methods above.
Soft, high-moisture herbs are trickier. Basil, mint, tarragon, and lemon balm can turn dark and musty if they dry too slowly, so they benefit from a dehydrator or a very well-ventilated air-drying spot rather than a slow, humid corner. Parsley, chives, and dill sit in between, drying reasonably well but losing more of their brightness than the woody herbs.
Step-by-Step Basics for Drying Any Herb
Keep bundles small and loose rather than thick and tightly packed, since airflow through the middle of a bundle is what prevents mould. Choose a warm, dry spot out of direct sun, since sunlight fades both colour and flavour.
Check regularly for any hint of mould, particularly in the first few days, and discard anything that shows grey or white fuzz rather than trying to salvage part of a batch. Herbs are ready when leaves crumble easily and stems snap cleanly rather than bend.
Storing Dried Herbs
Once fully dry, strip the leaves from the stems and store them whole or lightly crushed in airtight glass jars, since crushing too early releases the oils that carry the flavour. Keep jars away from heat, light, and steam, ideally in a cupboard rather than a shelf above the hob.
Label every jar with the herb and the date. Properly dried and stored herbs keep good flavour for around six to twelve months, after which they are still safe to use but will taste noticeably milder.
Method 2: Freezing Herbs
Freezing is the best option for softer, more delicate herbs that dry poorly, and it preserves a flavour much closer to fresh than drying ever can. The trade-off is that frozen herbs turn limp once thawed, so they work best cooked into a dish rather than scattered on top as a garnish.
Freezing Whole or Chopped Leaves
The simplest approach is to wash and thoroughly dry the herbs, then spread whole or roughly chopped leaves on a tray lined with baking paper. Freeze the tray flat for an hour or two until the herbs are firm, then transfer them into a labelled freezer bag, pressing out as much air as possible before sealing.
Freezing on a tray first, rather than bagging herbs straight away, stops them clumping into one solid block, so you can shake out just the amount you need later.
Freezing in Oil or Water: Herb Cubes
The ice-cube-tray method is especially good for herbs you use in cooked dishes like soups, stews, and sauces. Chop the herbs finely, pack them about three-quarters of the way up each section of the tray, then top up with a neutral oil or water so the herbs are just covered.
Oil generally gives better results than water, since oil-frozen cubes thaw more evenly and the herbs keep their colour and release their flavour more smoothly into a hot pan. Freeze until solid, usually three to four hours, then pop the cubes into a labelled freezer bag or container.
Best Herbs for Freezing
Parsley, coriander, chives, dill, and basil all freeze well, and soft “soup herb” mixes of two or three of these together are a genuinely useful thing to have stocked. Basil in particular keeps a much brighter flavour frozen than dried, though it will darken slightly, which is purely cosmetic and not a safety issue.
Avoiding Freezer Burn
Removing as much air as possible before sealing is the single biggest factor in preventing freezer burn, whether that means pressing a bag flat by hand or using a straw to suck out excess air before the final seal. Label every bag or cube tray with the herb and the date, since frozen herbs are easy to mix up once chopped.
Used within about six to eight months, frozen herbs keep good flavour and colour. Beyond that they remain safe to eat but will taste noticeably flatter.
How Frozen Herbs Behave in Cooking
Frozen herbs go straight from freezer to pan without thawing first, which makes them genuinely convenient on a weeknight. They are best added to cooked dishes such as sauces, stews, soups, and casseroles rather than used raw, since the texture softens completely once frozen and thawed.
Method 3: Infusing Herbs
This section covers simple kitchen infusions, meaning oils, vinegars, and honeys flavoured with herbs for cooking and everyday enjoyment, rather than medicinal preparations. If you are preserving herbs you also intend to use in a stronger, medicinal way, such as a concentrated tincture, that is a different process with different safety considerations, and it is worth checking with a pharmacist or doctor first if you are pregnant, on medication, or preparing anything for children.
Herb-Infused Oils: A Safety-First Method
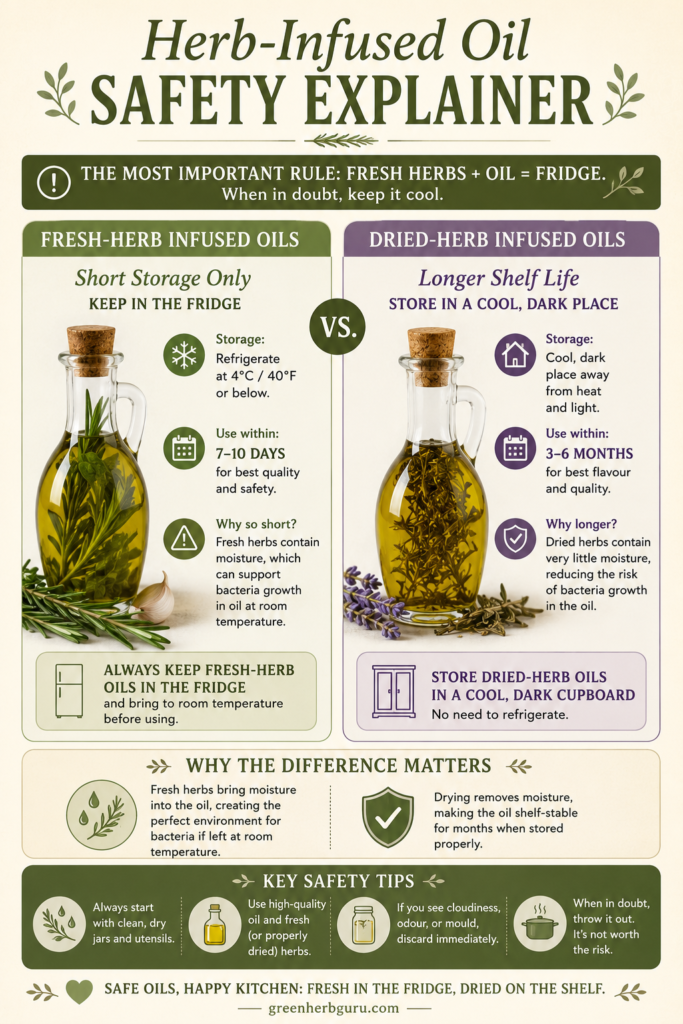
Herb-infused oils are the one method in this guide that genuinely needs extra care. Fresh herbs contain moisture, and moisture combined with oil creates a low-oxygen environment that can allow the bacteria responsible for botulism to grow, without necessarily changing the smell, taste, or appearance of the oil.
The safest home approach is to keep any oil infused with fresh herbs in the fridge, use it within two to four days, and never leave it at room temperature for more than a couple of hours. If you want an oil that keeps for longer on the counter, infuse it with fully dried herbs instead of fresh, since the lack of moisture in dried herbs removes the specific risk that makes fresh-herb oils time-limited.
To make a basic infused oil, warm a neutral or olive oil gently with dried herbs for a few minutes over low heat, then strain and bottle once cool. Store finished oil somewhere cool and dark, and treat any oil that smells off, looks cloudy, or has been sitting unrefrigerated for more than a day or two as one to throw away rather than risk.
Herb-Infused Vinegars
Vinegar is a friendlier medium than oil for fresh herbs, since its acidity does the safety work that oil cannot. Pack a clean, sterilised jar loosely with fresh or dried herbs, top up with vinegar, and leave it somewhere dark for two to three weeks, shaking occasionally.
Strain out the herbs once the flavour is where you want it, then store the finished vinegar in a cool, dark cupboard. A herb vinegar kept this way stays in good condition for several months, and refrigerating it after opening extends that further.
Herb Honeys and Syrups
Herb-infused honey and simple syrups are a gentler introduction to infusing, and they pair naturally with the drying and freezing methods above, since dried herbs work particularly well steeped into warmed honey. Warm honey gently with dried or fresh herbs, strain once infused, and store in a sealed jar in a cool cupboard, or the fridge if fresh herbs were used.
These are lovely stirred into tea, drizzled over yoghurt, or used in place of plain honey in baking, and a full walkthrough of ratios and storage lives in the dedicated herbal honey and syrups guide linked below.
Basic Steps and Safety Reminders for Any Infusion
Always start with a clean, sterilised jar or bottle, since bacteria on unwashed glass can undo an otherwise careful process. Fresh herbs bring a brighter flavour to an infusion, while dried herbs generally produce a more shelf-stable result, so the choice depends on whether you want speed and freshness or longevity.
Keep infused oils refrigerated and used within a short window, and treat vinegars as the safer choice whenever you want something that sits happily in a cupboard for months rather than days.
Choosing the Right Method for Each Herb
Woody herbs with lower moisture content, like rosemary, thyme, oregano, and sage, dry beautifully and are usually the best pantry-stable option. Soft, high-moisture herbs like basil, parsley, coriander, and mint tend to do better frozen, since drying can dull their flavour more noticeably.
Beyond texture, think about how you actually cook. A shelf-stable pantry herb makes sense for something like dried oregano you reach for weekly. A freezer cube is better for a herb you only need in small, pre-portioned amounts for soups and sauces. An infused oil or vinegar suits herbs you want as a finishing touch, drizzled over a dish rather than cooked into it.
Quick reference table
| Herb | Dries well | Freezes well | Infuses well |
|---|---|---|---|
| Basil | Fair | Excellent | Good (oil, with care) |
| Parsley | Good | Excellent | Good (vinegar) |
| Coriander | Fair | Excellent | Fair |
| Thyme | Excellent | Good | Excellent |
| Rosemary | Excellent | Good | Excellent |
| Oregano | Excellent | Good | Excellent |
| Mint | Fair | Good | Excellent (honey, vinegar) |
| Sage | Excellent | Good | Good |
| Dill | Good | Excellent | Good (vinegar) |
| Chives | Fair | Excellent | Fair |
Food Safety and Common Mistakes
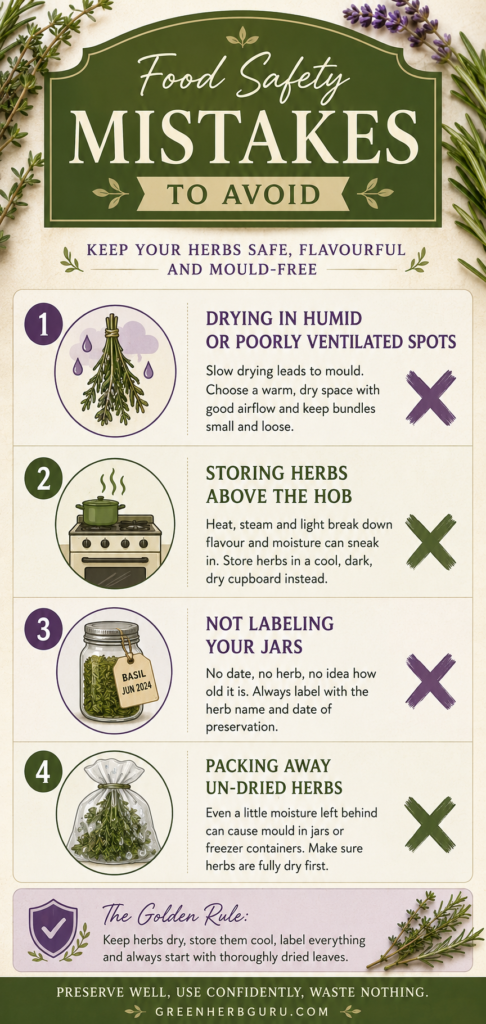
Dry, clean, and airtight are the three words to hold onto across every method in this guide. Moisture left in dried herbs, gaps in a freezer bag seal, or an infused oil left too long at room temperature are the root cause of almost every problem that comes up.
A few specific mistakes are worth calling out directly. Drying herbs in a humid kitchen or bathroom invites mould rather than preventing it. Storing dried herbs in a jar directly above the hob exposes them to heat and steam that shortens their shelf life fast.
Skipping labels leads to a cupboard full of mystery jars within a season. Packing herbs into a jar before they are fully dry is one of the most common causes of mould appearing days or weeks later, seemingly out of nowhere.
Practical Ways to Use Your Preserved Herbs
Dried herbs are the easiest to reach for daily, stirred into soups, stews, spice rubs, and homemade seasoning blends. Frozen herb cubes drop straight into weeknight sauces, casseroles, and simmering pans without any thawing or extra thought. Herb vinegars brighten a simple salad dressing or a quick pickle, and herb-infused oils make a lovely finishing drizzle over roasted vegetables or a simple marinade base.
A few easy starting points if you want a project rather than just a method: an Italian dried herb blend using equal parts dried oregano, basil, thyme, and rosemary, a batch of garden herb freezer cubes made from whatever soft herbs are about to bolt, or a rosemary-garlic vinegar left to steep for a couple of weeks before it goes into salad dressings.
Frequently Asked Questions
What is the fastest way to preserve a big glut of fresh herbs?
Freezing is generally the quickest, since there is no waiting for herbs to fully dry. Chopping and freezing in oil or water cubes can be done in under half an hour, ready to use straight from the freezer.
Can I dry herbs in the microwave?
It is possible for very small batches, using short 20 to 30 second bursts between paper towels, but results are inconsistent and it is easy to scorch the leaves. Air-drying, a dehydrator, or a low oven all give more reliable results for anyone doing more than a handful of leaves.
Is it safe to store herb-infused oil at room temperature?
Not if fresh herbs were used. Fresh-herb oils should be refrigerated and used within two to four days because of the botulism risk that comes from moisture trapped in an oxygen-free environment. Oils made with fully dried herbs are the safer option for longer, room-temperature storage.
How do I know if dried herbs have gone bad?
Dried herbs rarely go properly “off” in a dangerous sense, but they do fade in flavour over time. If you see any mould, a musty or damp smell, or the herbs feel at all soft rather than crisp, discard the jar rather than risk it.
Can I mix different herbs together before drying or freezing?
Yes, and blending herbs with similar drying or freezing needs, such as thyme, rosemary, and oregano together, or parsley, chives, and dill together, is a great way to build ready-made seasoning mixes for later.
Do frozen herbs lose their nutritional value?
Freezing preserves nutrients better than drying does, since there is no prolonged exposure to heat or air. Frozen herbs are a genuinely good way to keep both flavour and nutritional content close to fresh.
Continue Your Journey
Ready to build out your preservation know-how? These related guides go deeper on specific methods, herbs, and safety details covered above.
- Making Herbal Infused Oils at Home: A Safety-First Guide
- A Step-by-Step Guide on How to Make Homemade Rosemary Infused Oil
- How to Make Basil-Infused Olive Oil at Home
- Beginner’s Guide to Herbal Honey and Syrups: How to Make, Store, and Use Them
- Viral Herb-Preservation Hacks: Save Your Harvest Before Frost Hits
Want more beginner-friendly, research-backed herb guides like this one? Sign up for the Green Herb Guru newsletter for fresh growing tips, safe preservation how-tos, and simple herbal recipes straight to your inbox.


